
 Sometime in Dec 2003 Gary "sculpted" 4 bars into this shape, to act as support for the stair leading to the kids' rooms. Then placed the bars both vertical and horizontal to completee the steps of the stairs. We plan to have metal railings but we will do those at a much later time. For now this will just to give us easier access to the second floor so we can start working on it.
 The lighter and easier task of sanding was left to me; however, since we were seeing more up and down movement of heavy pieces of wood and building equipment like the table saw, we procrastinated the sanding until such time that it the stairs are ready for the finishing touch.
 Upon getting to the second floor this is what you will see...No railings yet.That wall far ahead meets the sloping ceiling. It will form part of the children's closets in the future. To the right are the boys' rooms-to-be, Juliana's and their bathroom (not seen here) will be on the left.
.jpg) This is the side where Juliana's room would be, and the bathroom (on the right) already partly has the sheetrock. Gary sets up the bars first, then when the sheetrock is up, he will saw off the bars at the bottom of the doorway.
This is the side where Juliana's room would be, and the bathroom (on the right) already partly has the sheetrock. Gary sets up the bars first, then when the sheetrock is up, he will saw off the bars at the bottom of the doorway.
.jpg) This is the view when emerging from the stairway and then standing on the left side. You will face this landing, which will give you a view of the living room if you are standing on its edge. We are currently utilizing it to store these pine bars (to be used for ceiling). Later it will contain books and probably a common computer (although we each have our own computers save for Ben...still working on his, waiting for the money to build one. Some parts are already with us, either from Gary's or mine upon upgrading ours, or given by other relatives/friends who upgraded theirs.) The windows as seen here are those of the living room. We might chop off some parts of these ceiling to make room for shelves or part of one closet room. We are flexible on our plans inside the house.
This is the view when emerging from the stairway and then standing on the left side. You will face this landing, which will give you a view of the living room if you are standing on its edge. We are currently utilizing it to store these pine bars (to be used for ceiling). Later it will contain books and probably a common computer (although we each have our own computers save for Ben...still working on his, waiting for the money to build one. Some parts are already with us, either from Gary's or mine upon upgrading ours, or given by other relatives/friends who upgraded theirs.) The windows as seen here are those of the living room. We might chop off some parts of these ceiling to make room for shelves or part of one closet room. We are flexible on our plans inside the house.
.jpg) This is an earlier photo of the side of the 2nd floor where Juliana's room and the bathroom would be. No division yet. The one with the smaller windows is the part where the bathroom would be. That fiberglass bathtub (standing next to the window) will be installed later.
This is an earlier photo of the side of the 2nd floor where Juliana's room and the bathroom would be. No division yet. The one with the smaller windows is the part where the bathroom would be. That fiberglass bathtub (standing next to the window) will be installed later.
 This part here somewhat shows the layers of the walls and the ceilings from outside inward:
(1) plywood
(2) green insulation board
(3) fiberglass insulation , attached to rafters and joists (wood bars that serve as support)
(4) plastic sheeting
(5) green insulation board (again, for the ceiling)
(6) sheetrock
The sheetrock serves as the inner wall. These are thick slabs of white and compact cement-like
chalk-like wall, attached to the supporting bars (joists and rafters). The blue lines there are the joint tapes, placed where sheetrocks meet, to cover the seams, and on which mud will be applied to fill in the spaces and sort of erase the seams to make it look like a continuous wall. The mud is allowed to dry for a day then sanded to make it smoother. Then another layer of mud is applied and dried and sanded for final smoothing, before the walls are painted finally. The joints at the corners will be covered later by trimmings (?) - bars of nice-looking smooth wood to hide where the paint ends.
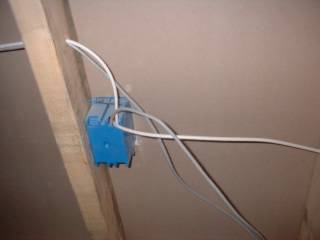 Of course before the sheetrocks are all in place, Gary had to install the power and telephone/computer lines. This is a socket for telephone and computers (we have a LAN of computers, the lines for which are those of the white cables; each has a port for internet connection, hence the telephone lines which are grey).Of course before the sheetrocks are all in place, Gary had to install the power and telephone/computer lines. This is a socket for telephone and computers (we have a LAN of computers, the lines for which are those of the white cables; each has a port for internet connection, hence the telephone lines which are grey).
 That blue box in this photo is a power line. There is another box that leads to the inside of the room, for light switch. The box facing the hall is part of a four-way switch that Gary made so that children (and adults) can turn off/on the lights from either side of the hall or from down the stairs. No groping, no trippin in the dark. The powerline is that yellow cable. That's a table saw in Juliana's room. That yellow rod is a leveling tool. (Gary would love a laser one which also comes with a stud-finder. A stud is that bar of wood that is sandwiched between the sheetrocks. Those are the only points were you could hammer/screw shelves/cabinets/frames, etc.).
 This is a closer look of the outside switch. You can also see a door trim already in place (dark brown in color).
No comments:
Post a Comment